How to Set Up Your Own Website
Dreaming of sharing your crochet creations with the world? Whether it’s a blog to showcase your latest afghan patterns, a space to teach beginners how to master their first granny square, or an online shop for your handmade scarves, launching a website doesn’t have to tangle up your yarn stash. In this guide, I’ll walk you through how to set up a website with Bluehost—a hosting provider I trust for my own crochet projects—and explain why pairing it with WordPress is as perfect as a well-tensioned stitch. Plus, I’ve got some affiliate links to Bluehost that’ll get you started at a cozy rate.
Step-by-Step Guide: How to Set Up Bluehost and Install WordPress
Launching a website can feel overwhelming, but with Bluehost and WordPress, it’s a straightforward process—even if you’ve never done it before. Below, I’ll walk you through every click and decision to get your site up and running. Plus, when you can use my affiliate link HERE to sign up with Bluehost, you can get started at only $1.99 a month! You’ll only find that deal here. Let’s dive in!
Step 1: Sign Up for Bluehost Hosting
- Visit Bluehost
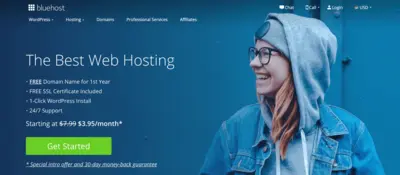
Start by heading to Bluehost’s website. (Pro tip: Use my affiliate link HERE to snag a discount for $1.99/month—plans often start at just $3.95/month with a free domain for the first year!)
- Choose a Plan
Click the green “Get Started” button. You’ll see four options: Basic, Choice Plus, Online Store, and Pro. For most beginners, the Basic plan is ideal—it supports one website, 10 GB of storage, and unmetered bandwidth, all at a budget-friendly price. If you think you’ll need more sites or features later, Choice Plus is a solid upgrade. Pick one and click “Select.”
- Enter Your Account Info
After picking a plan, you’ll move to the signup page. Fill in your name, email, and address. Then, choose your billing term—12, 24, or 36 months. The longer the term, the lower the monthly cost. I’d suggest 12 months to start; it’s a nice balance of savings and flexibility. Hit “Submit” when you’re done.
Step 2: Choose or Register a Domain Name
- Pick a New Domain
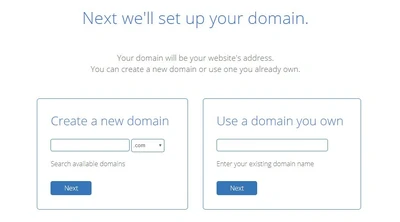
Next, you’ll be asked for a domain name. If you’re starting fresh, type in your idea—keep it short, catchy, and tied to your niche (like “JaneTravels” for a travel blog). Bluehost gives you a free domain for the first year with any plan, so take advantage! Hit “Next” to check availability. If it’s taken, tweak it (e.g., add “The” or a number) until you find a winner.
- Use an Existing Domain (Optional)
Already own a domain from another registrar? Select “Use a domain you own” on the right, type it in, and follow the prompts to point it to Bluehost later (you’ll adjust DNS settings—don’t worry, Bluehost’s support can guide you if needed). For now, let’s assume you’re grabbing a new one.
Step 3: Finalize Your Bluehost Account
- Review Package Details
You’ll see a breakdown of your plan cost. Scroll down to “Package Extras”—these are optional add-ons like Domain Privacy (hides your personal info from public records, worth considering at $14.88/year), SiteLock (security), or CodeGuard (backups). Beginners can skip these to save money—you can add them later if you want. Uncheck what you don’t need.
- Enter Payment Info
Add your credit card or PayPal details. Double-check everything, then click “Submit.” You’ll get a confirmation email with your account details—keep it handy!
Step 4: Log In and Start WordPress Installation
- Access Your Bluehost Dashboard
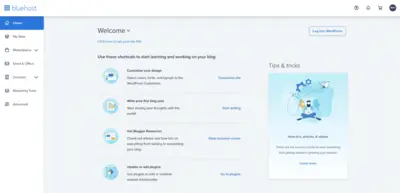
Once your payment’s processed, Bluehost will send you a welcome email with a login link. Click it (or go to bluehost.com and hit “Login” at the top), then enter your email and the password you set during signup. You’ll land in the Bluehost control panel—a sleek interface to manage your hosting.
- Navigate to “My Sites”
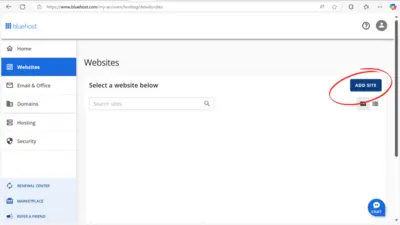
On the left sidebar, click “My Sites.” If this is your first site, it’ll be empty. Click the blue “Create Site” button to kick things off.
- Set Up WordPress Basics
Bluehost’s WordPress installer pops up. Enter a Site Name (e.g., “My Crochet Blog”—you can change this later) and a Tagline (e.g., “Patterns Daily”—optional but fun). Leave the “Directory” field blank unless you want your site in a subfolder (like www.yoursite.com/blog). Click “Next.”
Step 5: Install WordPress Automatically
- Let Bluehost Do the Work
Bluehost now installs WordPress for you—no manual downloads or coding required! It’ll configure the database and files behind the scenes. This takes about 1-2 minutes—grab a coffee if you like. Once it’s done, you’ll see a success message with your site’s URL (e.g., www.yourdomain.com) and admin login details.
- Note Your Login Credentials
Your WordPress admin username and password will be displayed (and emailed to you). Jot these down or save the email—you’ll need them soon. Click “Finish” to wrap up.
Step 6: Log Into WordPress and Get Started
- Access WordPress
Back in the Bluehost dashboard, go to “My Sites” again. You’ll see your new site listed—click “Log into WordPress.” This takes you to your site’s admin panel (usually www.yourdomain.com/wp-admin). Enter the username and password from Step 5, then hit “Log In.”
- Explore the Dashboard
Welcome to WordPress! On the left, you’ll see a menu:
- Appearance > Themes: Pick a free design (try “Astra” or “Twenty Twenty-Four”—they’re beginner-friendly).
- Posts > Add New: Write your first blog post.
- Pages > Add New: Create static pages like “About” or “Contact.”
- Plugins > Add New: Install extras like “Yoast SEO” for search visibility or “Jetpack” for performance.
- Preview Your Site
Click your site name at the top left, then “Visit Site” to see the live version. It’ll be basic at first—just a placeholder theme—but you can customize it however you want!
Troubleshooting Tips
- Site Not Loading? It might take 5-10 minutes for your domain to propagate. If it’s still blank after an hour, chat Bluehost’s 24/7 support—they’re awesome at fixing hiccups.
- Lost Login Info? Check your email or reset your password via Bluehost’s “Forgot Password” link on the login page.
Ready to Go Live?
That’s it—you’ve got a fully functional website! Bluehost and WordPress make it so easy, even for total newbies. Want to get started? Use my affiliate link HERE to sign up with Bluehost and launch your site today. It’s the same process I followed, and I couldn’t be happier with how simple it was.