
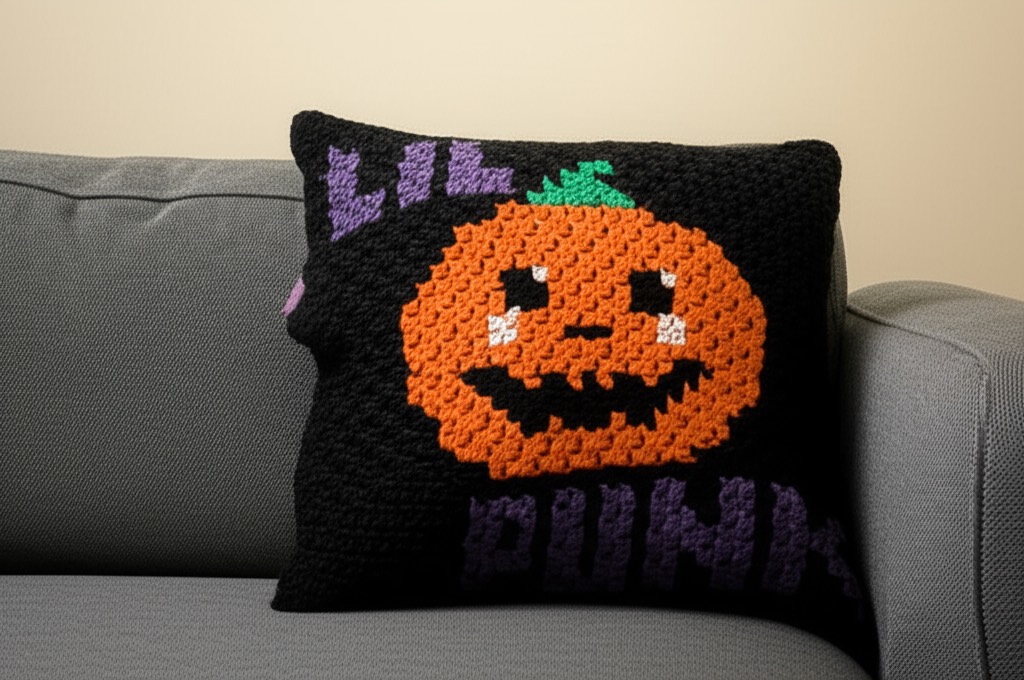
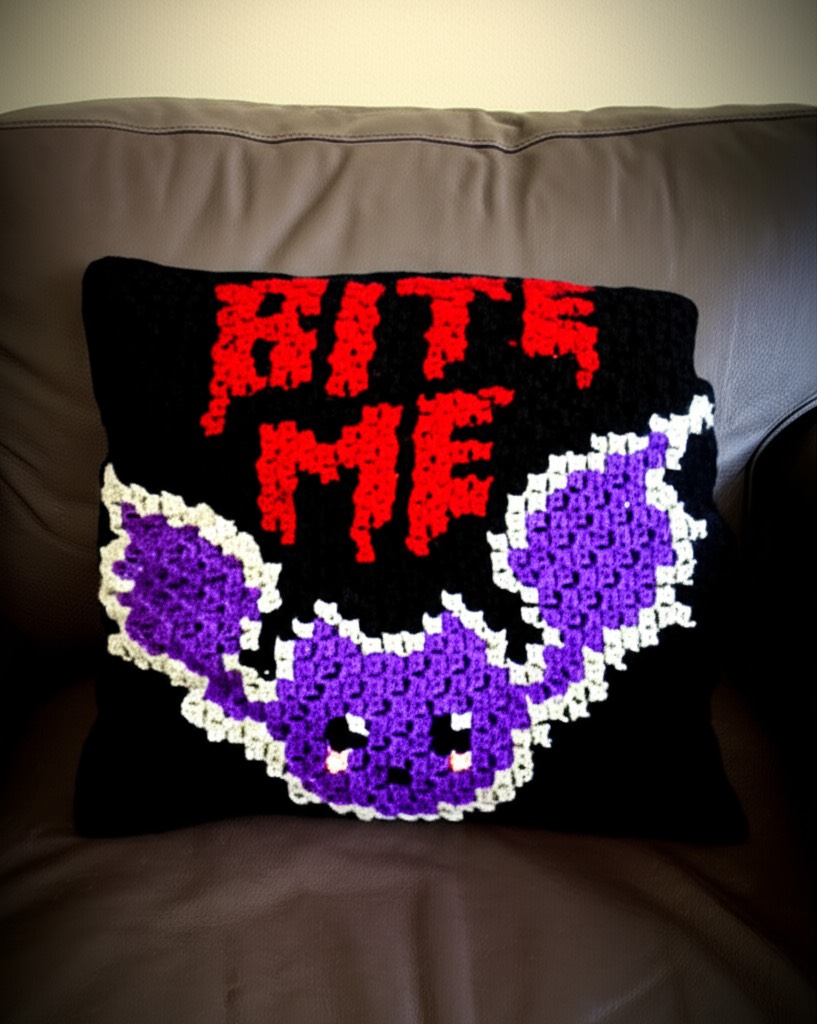
Show off your Halloween spirit and celebrate the best time of year with this cute throw pillow! This pattern features graphs for the “Bite Me Bat” and “Lil Punk Pumpkin” pumpkin designs. Make both for a reversible pillow or choose your favorite and make a solid color square for the back. The pillow is worked in the mini corner to corner method.
- Get the ad-free, large print, printable PDF pattern HERE. Scroll down for the free version.
- Grab the Head Turner Bundle that includes 33 patterns HERE.
- Add this pattern to your Ravelry queue HERE.
Halloween Crochet Throw Pillow Written Pattern
Materials
Bat:
- Caron Simply Soft: 1 skein black, 1 skein purple, 1 skein gray, 1 skein dark red (or other worsted weight yarn, or different weight yarn as needed to obtain gauge)
- Small amounts of white and pink yarn for the details. I suggest using scrap yarn.
Pumpkin:
- Caron Simply Soft: 1 skein black, 1 skein orange, 1 skein purple (or other worsted weight yarn, or different weight yarn as needed to obtain gauge)
- Small amounts of white, pink and green for the details. I suggest using scrap yarn.
- Size H8 – 5 mm hook or size needed to obtain gauge
- 1 x 18 inch throw pillow insert
Skill Level
Intermediate
Finished Measurements
18 x 18 in. (46 x 46 cm)
Abbreviations
- ch = chain
- yo = yarn over
- hdc = half double crochet
- sl st = slip stitch
- RS = right side
- WS = wrong side
Gauge
A square consisting of 8 blocks on each side should be roughly 3 inches across.
Notes
This pillow is worked in the mini corner to corner (mini C2C) method. Your first diagonal row will consist of 1 square. Each subsequent row will add one square. After the corner you will lose one square each row.
To make the first square: ch 4, hdc in 3rd and 4th ch from hook (1st square & row 1 completed)
To work an increasing row: ch 4, hdc in 3rd and 4th ch from hook, *sl st to ch 2 space of the next square from the previous row (you will need to flip the square up to reach it), ch 2, hdc twice in same ch 2 space* repeat from * to * until you make a square above the last square of the previous row.
To work a decreasing row: turn your work, sl st once along the top of the last square you made and once into the ch 2 space of the last square, *ch 2, hdc twice in same ch 2 space, sl st to ch 2 space of the next square from the previous row* repeat from * to * until you make a square next to the last square from the previous row.
Color Changes: When you have 3 loops of your hook from the last hdc of the current color, draw up a loop from the new color to pull through the 3 loops and finish the hdc, then sl st to the next square and complete it as normal with the new color.
It is suggested to work from the bottom left corner to the top right corner. When working on the right side of the work, keep your tails behind your work. When working on the wrong side of the work, keep your tails in front of your work.
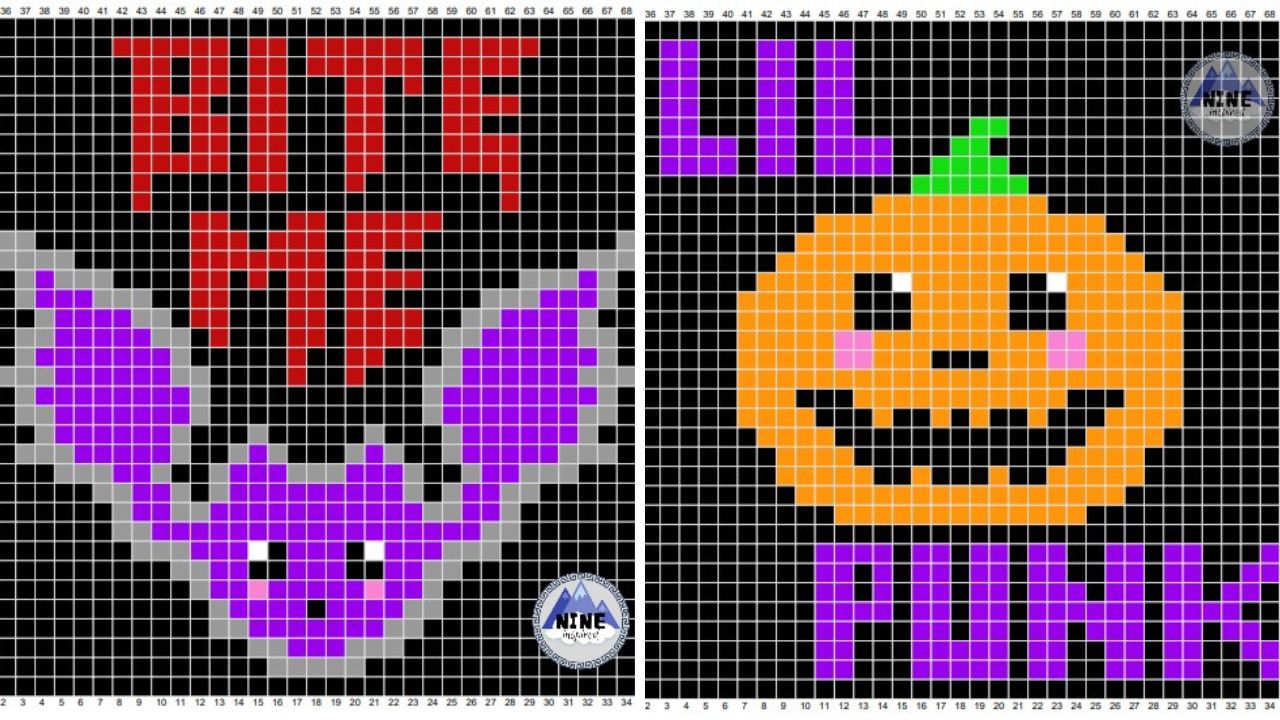
Bat Pattern

Instructions are given from the bottom left corner to the top right corner. When working on the right side of the work, keep your tails behind your work. When working on the wrong side of the work, keep your tails in front of your work. The arrows indicate the direction you are working. Graph is on the next page.
b = black, g = gray, p = purple,
pi = pink, w = white, r = red
→ Row 1 [WS]: b
← Row 2 [RS]: b2
→ Row 3 [WS]: b3
← Row 4 [RS]: b4
→ Row 5 [WS]: b5
← Row 6 [RS]: b6
→ Row 7 [WS]: b7
← Row 8 [RS]: b8
→ Row 9 [WS]: b9
← Row 10 [RS]: b10
→ Row 11 [WS]: b11
← Row 12 [RS]: b12
→ Row 13 [WS]: b13
← Row 14 [RS]: b14
→ Row 15 [WS]: b2, g, b12
← Row 16 [RS]: b3, g, b3, g2, b2, g2, b3
→ Row 17 [WS]: b2, g14, b
← Row 18 [RS]: b, g2, p3, g2, p2, g2, p2, g3, b
→ Row 19 [WS]: b2, g, p14, g, b
← Row 20 [RS]: b, g, p3, pi, p3, g, p6, g2, b2
→ Row 21 [WS]: b2, g, p6, g3, p2, b, p4, g, b
← Row 22 [RS]: b2, g, p, b, p, b, w, p2, b2, p6, g, b3
→ Row 23 [WS]: b2, g2, p6, g, b, g, p2, b, p4, g, b2
← Row 24 [RS]: b2, g, p8, g, b, g, p7, g3
→ Row 25 [WS]: b, g2, p8, b2, p8, g, b3
← Row 26 [RS]: b3, g, p, pi, b, p5, g, b, g, p6, g3, b2
→ Row 27 [WS]: b4, g3, p3, g2, b2, p5, b2, p, g, b4
← Row 28 [RS]: b4, g, p2, w, p3, g3, b2, g6, b6
→ Row 29 [WS]: b8, g3, b6, g, p5, g, b5
← Row 30 [RS]: b6, g, p4, g, b18
→ Row 31 [WS]: b11, r2, b6, p5, g, b6
← Row 32 [RS]: b7, g, p4, g, b6, r2, b11
→ Row 33 [WS]: b11, r2, b3, r, b3, p2, g2, p, g, b7
← Row 34 [RS]: b7, g, p, g, b, g3, b3, r, b3, r2, b2, r, b8
→ Row 35 [WS]: b8, r, b2, r2, b3, r, b7, g, p, g, b8
Corner
← Row 36 [RS]: b7, g, p2, b5, r, b, r2, b, r4, b2, r, b7
→ Row 37 [WS]: b6, r2, b2, r3, b, r2, b, r, b4, g2, p, g, b7
← Row 38 [RS]: b7, g, p2, g2, b2, r2, b, r3, b4, r3, b5
→ Row 39 [WS]: b4, r2, b, r, b3, r3, b, r2, b2, g, p4, g, b6
← Row 40 [RS]: b6, g, p4, g, b, r3, b, r2, b3, r2, b, r2, b3
→ Row 41 [WS]: b, r6, b, r, b, r2, b, r4, b, g, p4, g, b5
← Row 42 [RS]: b4, g, p5, g, b, r, b, r2, b, r, b, r2, b, r2, b, r2, b
→ Row 43 [WS]: b, r, b, r, b2, r2, b3, r3, b2, g, p5, g, b4
← Row 44 [RS]: b3, g, p5, g, b2, r, b, r2, b3, r2, b, r3, b
→ Row 45 [WS]: b, r2, b, r2, b4, r2, b3, g, p5, g2, b2
← Row 46 [RS]: b3, g, p4, g, b3, r2, b, r, b3, r2, b, r, b
→ Row 47 [WS]: b2, r2, b3, r, b2, r, b3, g, p5, g, b2
← Row 48 [RS]: b2, g2, p3, g, b3, r, b2, r2, b3, r2, b
→ Row 49 [WS]: b, r, b3, r2, b7, g, p3, g, b2
← Row 50 [RS]: b, g3, p2, g, b7, r2, b, r, b2
→ Row 51 [WS]: b, r4, b8, g, p, g2, b2
← Row 52 [RS]: b3, p, g, b5, r, b3, r3, b
→ Row 53 [WS]: b, r2, b3, r2, b, r, b3, p, g, b2
← Row 54 [RS]: b2, g2, b3, r4, b, r3, b
→ Row 55 [WS]: b, r2, b, r4, b4, g, b2
← Row 56 [RS]: b, g, b5, r, b, r2, b, r, b
→ Row 57 [WS]: b2, r3, b6, g, b
← Row 58 [RS]: g, b6, r, b, r2, b
→ Row 59 [WS]: b, r2, b8
← Row 60 [RS]: b7, r2, b
→ Row 61 [WS]: b, r, b7
← Row 62 [RS]: b6, r, b
→ Row 63 [WS]: b7
← Row 64 [RS]: b6
→ Row 65 [WS]: b5
← Row 66 [RS]: b4
→ Row 67 [WS]: b3
← Row 68 [RS]: b2
→ Row 69 [WS]: b
Pumpkin Pattern

Instructions are given from the bottom left corner to the top right corner. When working on the right side of the work, keep your tails behind your work. When working on the wrong side of the work, keep your tails in front of your work. The arrows indicate the direction you are working. Graph is on the next page.
b = black, p = purple, o = orange
pi = pink, w = white, g = green
→ Row 1 [WS]: b
← Row 2 [RS]: b2
→ Row 3 [WS]: b3
← Row 4 [RS]: b4
→ Row 5 [WS]: b5
← Row 6 [RS]: b6
→ Row 7 [WS]: b7
← Row 8 [RS]: b8
→ Row 9 [WS]: b9
← Row 10 [RS]: b10
→ Row 11 [WS]: b11
← Row 12 [RS]: b, pu, b10
→ Row 13 [WS]: b10, (pu) x 2, b
← Row 14 [RS]: b2, (pu) x 2, b10
→ Row 15 [WS]: b10, (pu) x 2, b3
← Row 16 [RS]: b4, (pu) x 2, b10
→ Row 17 [WS]: b10, (pu) x 3, b2, pu, b
← Row 18 [RS]: b, (pu) x 2, b, pu, b, (pu) x 2, b10
→ Row 19 [WS]: b11, pu, b, pu, b, (pu) x 3, b
← Row 20 [RS]: b, (pu) x 4, b, (pu) x 2, b2, o2, b8
→ Row 21 [WS]: b6, o6, b, pu, b, (pu) x 2, b, (pu) x 2, b
← Row 22 [RS]: b2, (pu) x 2, b, (pu) x 2, b2, o7, b6
→ Row 23 [WS]: b6, o8, b, (pu) x 2, b, (pu) x 2, b, pu, b
← Row 24 [RS]: b, (pu) x 2, b, (pu) x 2, b, pu, b, o9, b6
→ Row 25 [WS]: b6, o3, b5, o2, b2, (pu) x 2, b, (pu) x 2, b2
← Row 26 [RS]: b3, (pu) x 2, b, (pu) x 2, b, o2, b5, o4, b6
→ Row 27 [WS]: b6, o5, b4, o3, b, pu, b, (pu) x 2, b2, pu, b
← Row 28 [RS]: b, (pu) x 6, b2, o2, b3, o7, b7
→ Row 29 [WS]: b7, o4, pi, o2, b4, o2, b, (pu) x 6, b2
← Row 30 [RS]: b, pu, b, (pu) x 2, b2, pu, b, o2, b4, o2, (pi) x 2, o3, b5, pu, b2
→ Row 31 [WS]: b2, (pu) x 2, b4, o4, pi, o4, b2, o3, b3, (pu) x 2, b, (pu) x 2, b
← Row 32 [RS]: b2, (pu) x 2, b, (pu) x 2, b2, o2, b4, o4, b, o3, b4, (pu) x 3, b2
→ Row 33 [WS]: b2, (pu) x 4, b3, o3, b2, o5, b3, o2, b, (pu) x 2, b, (pu) x 2, b3
← Row 34 [RS]: b4, (pu) x 2, b, pu, b2, o2, b3, o2, b, o, b3, o2, b4, pu, b, (pu) x 2, b2
→ Row 35 [WS]: b2, (pu) x 2, b3, pu, b2, o3, b2, o2, b, o2, b3, o2, b3, (pu) x 6, b
Corner
← Row 36 [RS]: b, (pu) x 3, b, (pu) x 2, b2, o3, b, o3, b, o3, w, o3, b2, (pu) x 2, b3, (pu) x 2, b
→ Row 37 [WS]: b, pu, b3, (pu) x 2, b3, o10, b2, o2, b3, pu, b, pu, b3
← Row 38 [RS]: b2, pu, b5, o3, b, o10, b2, pu, b, (pu) x 2, b4
→ Row 39 [WS]: b3, (pu) x 2, b, (pu) x 2, b, o10, b2, o2, b5, pu, b2
← Row 40 [RS]: b, pu, b6, o2, b, o, pi, o, b, o6, b, (pu) x 3, b, (pu) x 2, b2
→ Row 41 [WS]: b, (pu) x 2, b, (pu) x 4, b, o5, b2, (pi) x 2, o, b, o2, b5, pu, b
← Row 42 [RS]: b7, o4, pi, b3, o4, g, b, pu, b, (pu) x 2, b, pu, b
→ Row 43 [WS]: b2, (pu) x 2, b4, g, o4, b2, o6, b6
← Row 44 [RS]: b6, o6, w, o4, g2, b4, (pu) x 2, b
→ Row 45 [WS]: b, pu, b5, g2, o10, b6
← Row 46 [RS]: b6, o9, g3, b6
→ Row 47 [WS]: b6, g3, o8, b6
← Row 48 [RS]: b6, o6, b4, g, b5
→ Row 49 [WS]: b5, g, b4, o5, b6
← Row 50 [RS]: b20
→ Row 51 [WS]: b19
← Row 52 [RS]: b18
→ Row 53 [WS]: b17
← Row 54 [RS]: b16
→ Row 55 [WS]: b15
← Row 56 [RS]: b14
→ Row 57 [WS]: b13
← Row 58 [RS]: b12
→ Row 59 [WS]: b11
← Row 60 [RS]: b10
→ Row 61 [WS]: b9
← Row 62 [RS]: b8
→ Row 63 [WS]: b7
← Row 64 [RS]: b6
→ Row 65 [WS]: b5
← Row 66 [RS]: b4
→ Row 67 [WS]: b3
← Row 68 [RS]: b2
→ Row 69 [WS]: b
Construction
With wrong sides facing each other, sl st the two squares together on 3 of the sides, insert an 18 in throw pillow form and sl st the 4th side.
Love this pattern? You might like these other free Halloween crochet patterns:
© 2025 Littlejohn’s Yarn. All rights reserved.
Originally designed by Nine Inspired, this pattern has found a new home with Littlejohn’s Yarn and is shared here with permission.