
If you haven’t seen the new Netflix show Wednesday yet…then I’m sure you’re a very busy person who has better things to do with their time than binge watch TV. I, on the other hand, have no such qualms, because what else am I supposed to do while I crochet?!
So I guess what I’m trying to say is that you should really watch this show if you haven’t because otherwise you’re not really going to get how amazing my new Wednesday crochet pattern is!
There is a ton of amazing crochet representation in the show from black and white checkered sweater vests, to crochet lace collars, and even snoods. I’ll admit that I was basically fangirling every time something crocheted popped up on the screen!
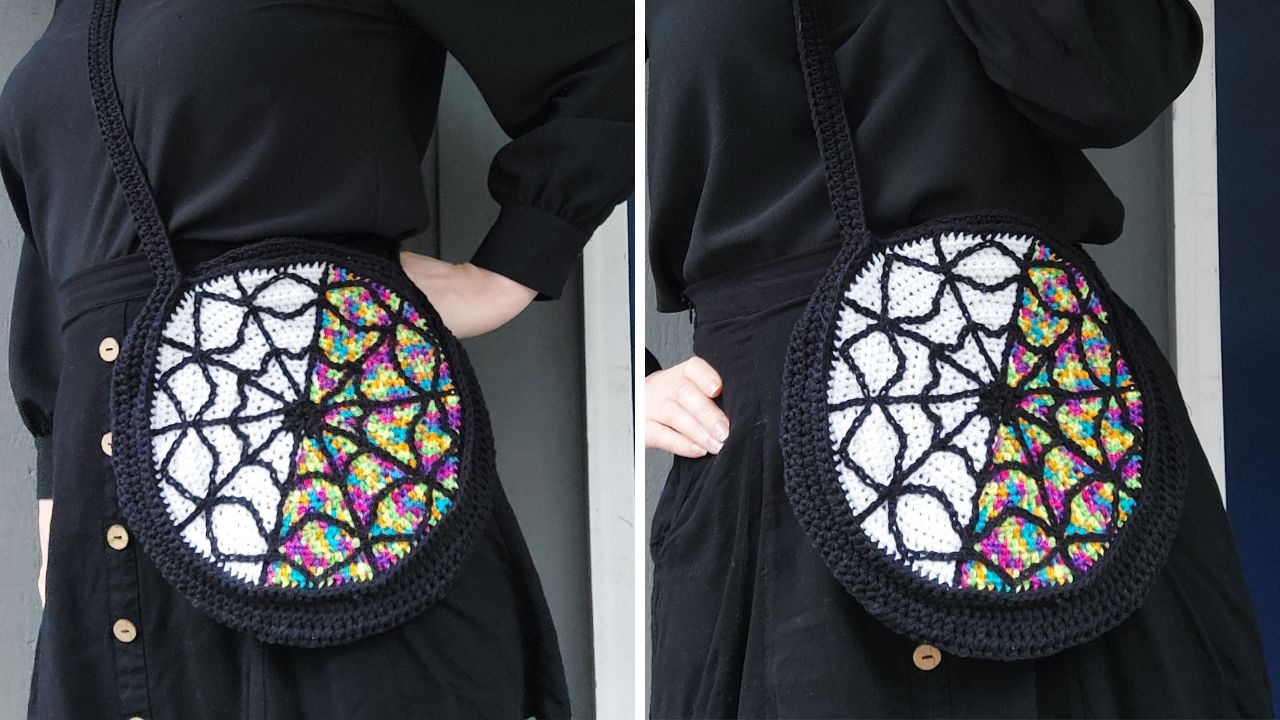
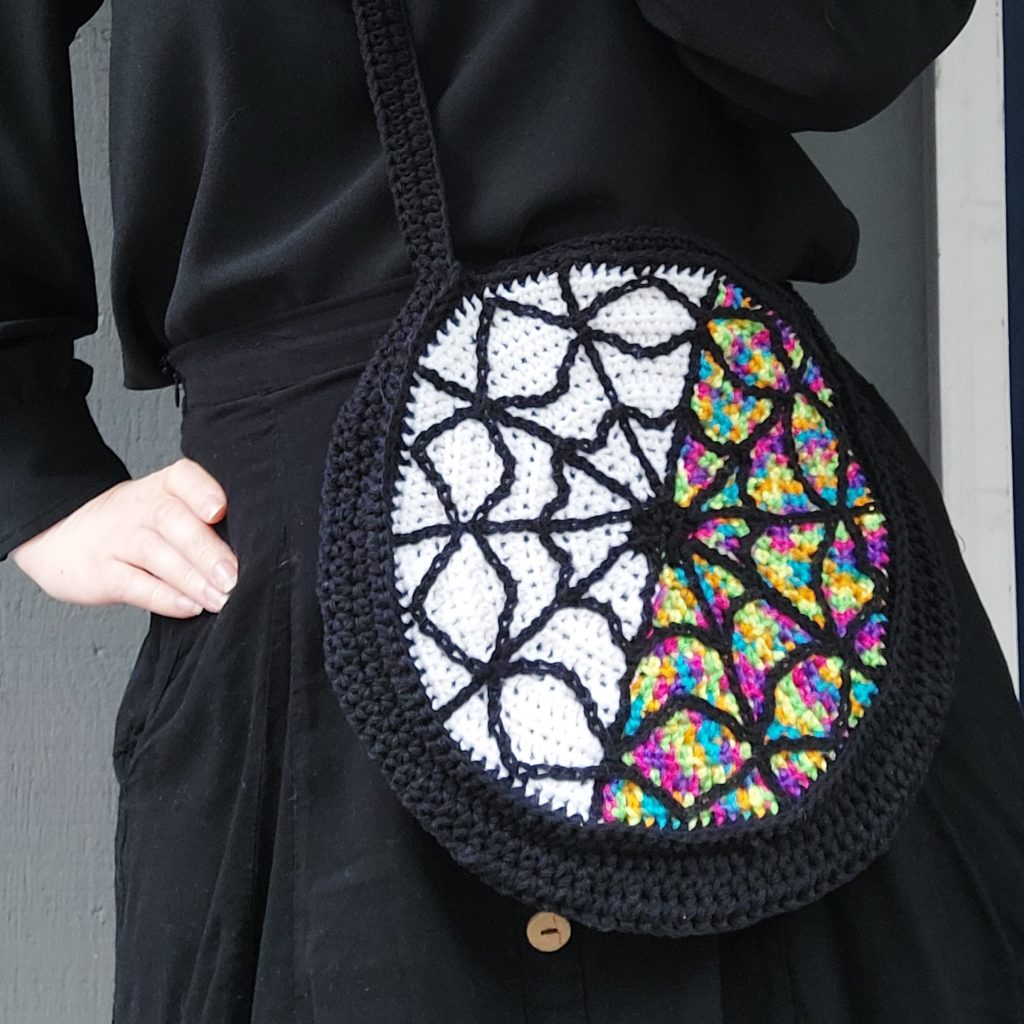
I decided to take inspiration from a different source for my Wednesday crochet pattern. The iconic gothic window in the dorm room that Wednesday and Enid shares steals center stage in this cute and macabre crochet round bag design. What do you think?!
- Get the ad-free, large print, printable PDF pattern HERE. Scroll down for the free version.
- Grab the Head Turner Bundle that includes 33 patterns HERE.
- Add this pattern to your Ravelry queue HERE.
PATTERN
Ophelia Round Bag
Materials
- Worsted #4 Weight Yarn (I used Lily Sugar ‘n’ Cream in Black, Cascade Yarns Pacific in White, and Premier Home Cotton in Rainbow)
- 4 mm Crochet Hook
- Stitch Markers
Skill Level
Intermediate
Finished Measurements
11×11 inches not including strap (28 x 28 cm)
Abbreviations
US Terminology
- ch = chain
- st = stitch
- sl st = slip stitch
- sc = single crochet
- hdc = half double crochet
Special Techniques
Notes
- Do not fasten off the old color when you change to a new color of yarn. Just let it hang off the back of the project and pick it back up when you need it.
Front of Bag
Note: Worked in turned rounds
Start with a magic circle or ch 2 and work your stitches into the 2nd ch from the hook.
Round 1: with black, hdc 10, switch to white, sl st to join, turn. (10)
Round 2: 2 hdc in each of the next 5 sts, switch to rainbow, 2 hdc in each of the next 5 sts, sl st to join turn. (20)
Round 3: (hdc in the next st, 2 hdc in the next st) x5, switch to white, (hdc in the next st, 2 hdc in the next st) x5, sl st to join, turn. (30)
Round 4: (hdc in the next 2 sts, 2 hdc in the next st) x5, switch to rainbow, (hdc in the next 2 sts, 2 hdc in the next st) x5, sl st to join, turn. (40)
Round 5: (hdc in the next 3 sts, 2 hdc in the next st) x5, switch to white, (hdc in the next 3 sts, 2 hdc in the next st) x5, sl st to join, turn. (50)
Round 6: (hdc in the next 4 sts, 2 hdc in the next st) x5, switch to rainbow, (hdc in the next 4 sts, 2 hdc in the next st) x5, sl st to join, turn. (60)
Round 7: (hdc in the next 5 sts, 2 hdc in the next st) x5, switch to white, (hdc in the next 5 sts, 2 hdc in the next st) x5, sl st to join, turn. (70)
Round 8: (hdc in the next 6 sts, 2 hdc in the next st) x5, switch to rainbow, (hdc in the next 6 sts, 2 hdc in the next st) x5, sl st to join, turn. (80)
Round 9: (hdc in the next 7 sts, 2 hdc in the next st) x5, switch to white, (hdc in the next 7 sts, 2 hdc in the next st) x5, sl st to join, turn. (90)
Round 10: (hdc in the next 8 sts, 2 hdc in the next st) x5, switch to rainbow, (hdc in the next 8 sts, 2 hdc in the next st) x5, sl st to join, turn. (100)
Round 11: (hdc in the next 9 sts, 2 hdc in the next st) x5, switch to white, (hdc in the next 9 sts, 2 hdc in the next st) x5, sl st to join, turn. (110)
Round 12: (hdc in the next 10 sts, 2 hdc in the next st) x5, switch to rainbow, (hdc in the next 10 sts, 2 hdc in the next st) x5, switch to black, sl st to join, turn. (120)
Round 13: sc in each st around, fasten off.
Back of Bag
Note: Worked in turned rounds
Start with a magic circle or ch 2 and work your stitches into the 2nd ch from the hook.
Round 1: with black, hdc 10, sl st to join, turn. (10)
Round 2: 2 hdc in each st around, sl st to join turn. (20)
Round 3: (hdc in the next st, 2 hdc in the next st) x10, sl st to join, turn. (30)
Round 4: (hdc in the next 2 sts, 2 hdc in the next st) x10, sl st to join, turn. (40)
Round 5: (hdc in the next 3 sts, 2 hdc in the next st) x10, sl st to join, turn. (50)
Round 6: (hdc in the next 4 sts, 2 hdc in the next st) x10, sl st to join, turn. (60)
Round 7: (hdc in the next 5 sts, 2 hdc in the next st) x10, sl st to join, turn. (70)
Round 8: (hdc in the next 6 sts, 2 hdc in the next st) x10, sl st to join, turn. (80)
Round 9: (hdc in the next 7 sts, 2 hdc in the next st) x10, sl st to join, turn. (90)
Round 10: (hdc in the next 8 sts, 2 hdc in the next st) x10, sl st to join, turn. (100)
Round 11: (hdc in the next 9 sts, 2 hdc in the next st) x10, sl st to join, turn. (110)
Round 12: (hdc in the next 10 sts, 2 hdc in the next st) x10, sl st to join, turn. (120)
Round 13: sc in each st around, fasten off.
Note: My back of bag ended up a little bit larger than my front of bag due to the black yarn being slightly thicker and stiffer. Everything still connected just fine, you can just see more of the black part peeking out from behind the front of the bag. So don’t worry if your circles aren’t the exact same size!
Adding the Window Panes
Starting from the edge, surface crochet to the center following the increases and then back out to the side following along the next batch of increases, fasten off. Repeat until you have 10 lines leading from the edge to the center.
Starting from one line at the 6th round, surface crochet down to the 4th round and back up to the 6th round to connect with the next line. Repeat until you get back to where you started, fasten off.
Starting from one line at the 10th round, surface crochet down to the 4th round and back up to the 8th round to connect with the next line.
Repeat until you get back to where you started, do not fasten off.
Continue to surface crochet up to the edge and back down to the next line at the 10th round. Repeat until you get back to where you started, fasten off.
Crossbody Strap
Strap length will depend on the height of the person the bag is intended for.
If the person’s height is less than 5’2” (1.57 meters) you will ch 220.
If the person’s height is between 5’2” (1.57 meters) and 5’8” (1.72 meters) you will ch 236.
If the person’s height is greater than 5’8” (1.72 meters) you will ch 257. Being careful not to twist the chain, sl st to join to the last ch to the first ch to make a big loop.
Note: You can wait to join to make a loop until after completing the first row. This makes it easier to keep it from twisting. You’ll just need to go back and use the starting tail to close up the gap at some point.
Row 1: Ch 1, hdc in each st, sl st to the top of the 1st st to join.
Row 2: Ch 1, hdc in each st, continue to next section without fastening off.
Assembly
Lay the front of the bag down face up so that the rainbow half is to the left and the white half is to the right. Place 2 stitch markers as shown:
Starting at the left stitch marker, sc through both the front of the bag and the strap of the bag all the way around to the right stitch marker, fasten off. Here’s what it looks like after you’ve done a few stitches:
We’re going to join the back of the bag to the strap in the same way. Lay the front and back pieces of the bag together to determine placement, and then move the stitch markers from the front to the back. Attach your yarn at the left stitch marker and sc through both the back of the bag and the strap of the bag all the way around to the right stitch marker, fasten off.
Love Wednesday crochet patterns? You might like this other free crochet pattern:

© 2025 Littlejohn’s Yarn. All rights reserved.
Originally designed by Nine Inspired, this pattern has found a new home with Littlejohn’s Yarn and is shared here with permission.