The perfect summer east crochet hat
If you are looking for a lightweight summer crochet hat pattern hat for the warmer weather, this it. This is an intermediate crochet pattern. Don’t worry, I’ll take you step by step through the process of making this easy crochet hat. Grab your hook and let’s get started.
- More summer hat patterns

We all know I have some of the best followers around. So to give “thanks”, I want to share their beautiful work with you.
Thank you, Gloria Blasher-Graham
and
Kellie Everette: IG @qodeshcreativecollective Etsy


Crochet Hat Video Pattern
Your work can be featured on my site to! Tag me on Instagram HERE or join my Facebook group HERE.
PATTERN
- Get the ad-free, large print, printable PDF pattern HERE.
- Grab the Ultimate Pattern Bundle that includes 28 of my patterns just like this one for under $20 HERE.
- PIN this pattern to your Pinterest boards for later HERE.
- Add this pattern to your Ravelry queue HERE.
- Check out all my favorite crafty things HERE.
Materials
Caron Simply Soft #4 worsted weight yarn 250 yards (228.6 m)
Scissors
Video tutorial https://youtu.be/pYq8YDE1jYo
Stitches
Sl st- Slip stitch
Ch- Chain
Sc- Single crochet
Blsc- Back loop single crochet
Sc2tog- Single crochet 2 stitches together
Dc- Double crochet
Dc2tog- Double crochet 2 stitches together4
Peak – center stitch of “3 sc” group
Specialty stitches
Peak- center stitch of “3 sc” group
Sc2tog- Insert hook in next ch-5 space, yarn over and pull up loop (2 loops on hook). Insert hook in next ch-5 space, yarn over and pull up a loop (3 loops on hook), yarn over and draw through all 3 loops on hook
Dc2tog- Yarn over, insert hook into the next stitch, yarn over and pull up a loop (three loops on hook). Yarn over, pull through two loops (2 loops on hook). Yarn over, insert hook into the next stitch, yarn over and pull up a loop (4 loops on hook). Yarn over, pull through two loops (three loops on hook). Yarn over, pull through remaining 3 loops.
*Note: Ch 1 does not count as a stitch.
In parentheses at the end of some rows are video timestamps to the pattern tutorial to reference along with this pattern.
Flower Petal Make 5
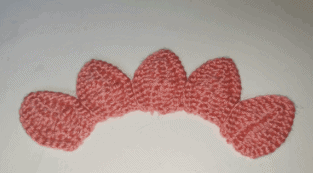
*petal diagram on page 4
Ch 12
Row 1: Sc in the 2nd ch from hook, sc, hdc, dc, 2 tr, 2 dc st, 2 hdc, 3 sc in last st. Working bottom of original ch creating mirror sts. 2 hdc, 2 dc, 2 tr, dc, hdc, sc in the next 2 sts, turn. (23) (video 0:30)
Row 2: Ch 1, blsc next 11 sts, 3 blsc next st, blsc next 11 sts. Fasten off
Sew 5 petals together starting at the base to the 6th stitch. After petal are sewn together, will begin sc across bottom of petals
Row 1: Evenly place 3 sc per petal across, turn. (15)
Row 2: Ch 1, *sc next 3 sts, sc2tog*, repeat *to* across, sl st in to the first sc st to form a circle.
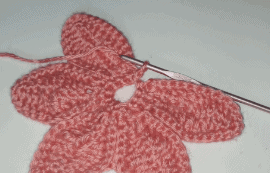
Mesh
(RS) Find center most sc of “3sc” on your petal. Count 3 stitches to the right and attach yarn.
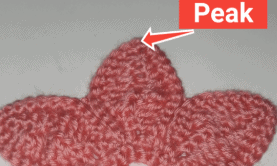
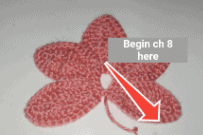
Row 1: Ch 8, *sc in peak, ch 5, sk 2 sts. Begin first half of dc2og, then complete the second half of stitch 3 sts to the right of your peak on the next petal, ch 5* 4 times. Ch 5, sk 2, dc, turn. (Video 13:16)
Row 2: Ch 1, sc, ch 5, sc in next sc st, ch 5. *Sc in ch-5 sp, ch-5, sc in dc2tog st, ch 5, sc in ch-5 sp, ch 5, sc in previous row’s sc, ch 5*, repeat *to* across, sc in 3rd ch of previous row’s ch-8, turn. (18 loops)
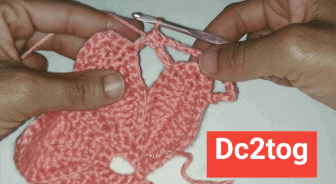
Row 3-8: Ch 1, sc, sl st in ch-5 sp, ch 5, *sc in ch-5 sp, ch 5*, repeat *to* across, sc in last sc st, turn. (18) (video 24:14)
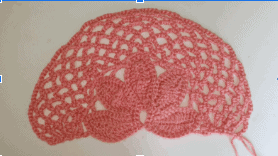
Row 9: Ch 1, sc, sl st in ch-5 sp, ch 5, (sc in ch-5 sp, ch 5) 7 times, sc2tog, ch 5, (sc in ch-5 sp, ch 5) 8 times, sc in last sc st, turn. (17 loops) (Video 26:10)
Row 10: Ch 1, sc, sl st in ch-5 sp, ch 5, (sc in ch-5 sp, ch 5) 6 times, sc2tog, ch 5, (sc in ch-5 sp, ch 5) 8 times, sc in last sc st, turn. (16 loops)
Row 11: Ch 1, sc, sl st in ch-5 sp, ch 5, *sc in ch-5 sp, ch 5*, repeat *to* across, sc in previous rows sc, turn. (16 loops) (video 13:00)
Row 12: Ch 1, sc, sl st in ch-5 sp, ch 5, (sc in ch-5 sp, ch 5) 8 times, sc2tog, ch 5. (Sc in ch-5 sp, ch 5) 5 times, sc in last sc st, turn. (15 loops)
Row 13: Ch 1, sc, sl st in ch-5 sp, ch 5, (sc in ch-5 sp, ch 5) 7 times, sc2tog, ch 5. (Sc in ch-5 sp, ch 5) 5 times, sc in last sc st, turn. (14 loops) (video 35:43)
Row 14: Ch 1, sc, sl st in ch-5 sp, ch 5, (sc in ch-5 sp, ch 5) 6 times, sc2tog, ch 5. (Sc in ch-5 sp, ch 5) 5 times, sc in last sc st, turn. (13 loops)
Row 15: Ch 1, sc, sl st in ch-5 sp, ch 5, (sc in ch-5 sp, ch 5) 5 times, sc2tog, ch 5. (Sc in ch-5 sp, ch 5) 5 times, sc in last sc st, turn. (12 loops)
Row 16: Ch 1, sc, sl st in ch-5 sp, ch 5, (sc in ch-5 sp, ch 5) 5 times, sc2tog, ch 5. (Sc in ch-5 sp, ch 5) 4 times, sc in last sc st, turn. (11 loops)
Row 17: Ch 1, sc, sl st in ch-5 sp, ch 5, (sc in ch-5 sp, ch 5) 2 times, sc2tog, ch 5. Sc in ch-5 sp, ch 5, sc2tog, ch 5, (sc in ch-5 sp, ch 5) 3 times, sc in last sc st, turn. (9 loops)
Row 18: Ch 1, sc, sl st in ch-5 sp, ch 5, (sc in ch-5 sp, ch 5) 3 times, sc2tog, ch 5. Sc in ch-5 sp, ch 5, (sc in ch-5 sp, ch 5) 3 times, sc in last sc st, ch 2, turn. (8 loops)
Row 19 (Larger heads only 23+): Ch 1, sc, sl st in ch-5 sp, ch 5, (sc in ch-5 sp, ch 5) 3 times, sc2tog, ch 5. (Sc in ch-5 sp, ch 5) 2 times, sc in last sc st, turn. (7 loops)
Closing off cap

(WS) Place hat with open side facing each other. You will be working in a zigzag pattern. Working into the front panel, then working into the back panel. See video for visual details.
Row 19: Place side together. Sl st into opposite side’s sc, *Ch 3, sl st opposite (Back) side’s ch-5 sp*, repeat *to* til end. Fasten off. (video 47:40)
*Note Row 19 is worked similar to the mattress stitch, working from the back to the front panel of your cap. Instead of sewing your are using chain 3 sts and slip sts.
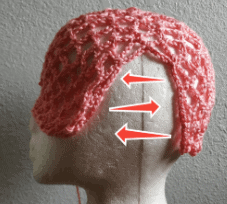
Brim (video 49:35)
Attach yarn to any sc st on bottom of petal.
Round 1: Ch 1, evenly sc in each st around, sl st to join.
Round 2-3: Ch 2 (doesn’t count as st), dc in each st around, sl st to join.
If you enjoyed this pattern, check out these other summer hat patterns

