
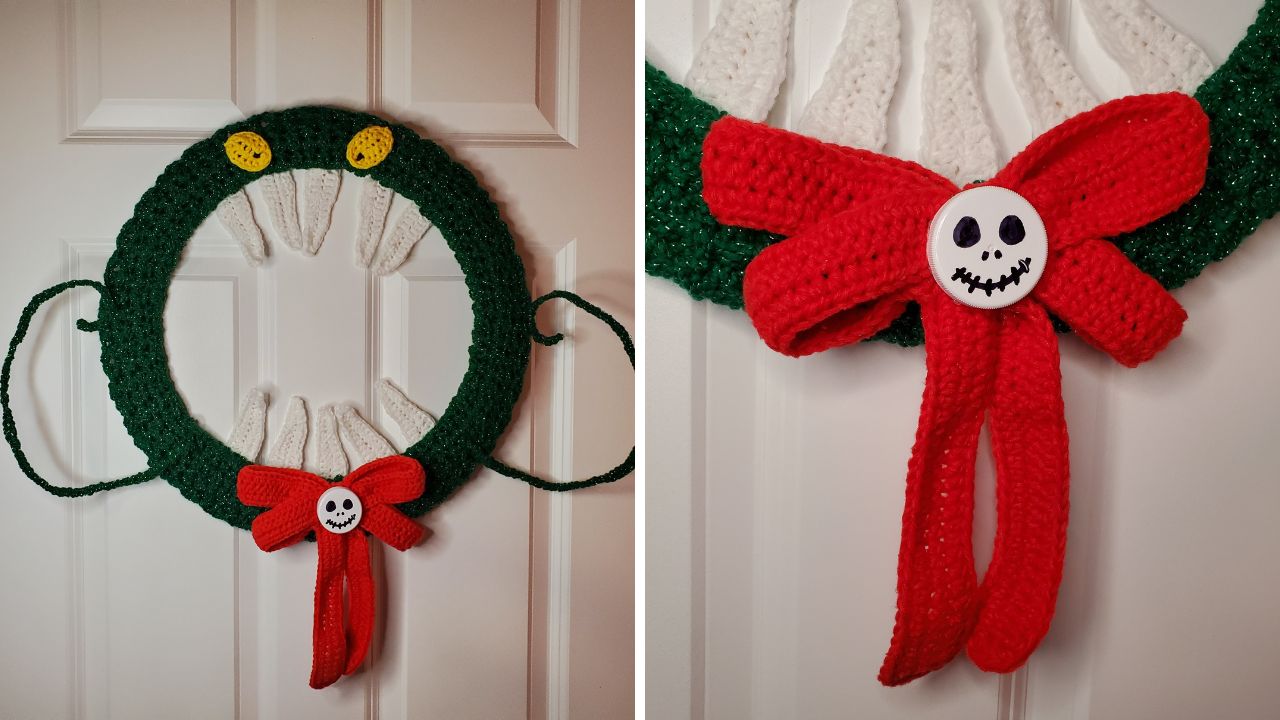
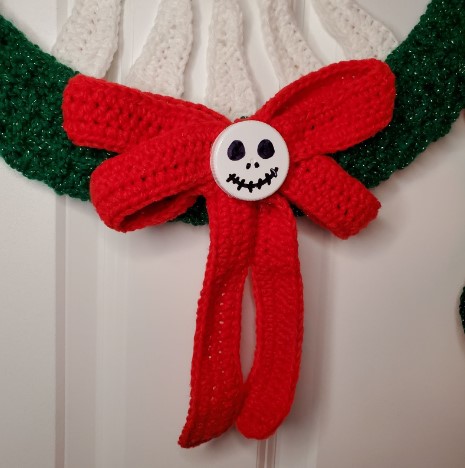
Get in the spirit with this cute and colorful NBC inspired crochet Christmas wreath pattern. Your house will be the talk of the block with this adorable decoration.
Fans of the Nightmare Before Christmas know that this movie is perfect for Halloween, Christmas and for all the days in between. Now you can show off your love for this movie and it’s cozy/creepy aesthetic with this fantastic wreath design!
- Get the ad-free, large print, printable PDF pattern HERE. Scroll down for the free version.
- Add this pattern to your Ravelry queue HERE.
Materials
- Worsted, size 4, medium yarn
- Green
- White
- Yellow
- Red
- 5.5 mm hook
- Embroidery Needle
- Wreath Form
- Popsicle Sticks, stiff felt, plastic canvas, or sturdy cardboard (Optional – to give support to the teeth)
- Jar Lid or Bottle Cap (Optional – to add skull to bow center)
Finished Measurements
18” (46 cm)
Abbreviations
US Terminology
- ch = chain
- st = stitch
- sp = space
- sk = skip
- sl st = slip stitch
- sc = single crochet
- hdc = half double crochet
- rep = repeat
Special Stitches
Puff: (Yarn over, insert hook in next st and pull up a loop) twice, yarn over and pull through all 5 loops.
SP = Split Puff: (yarn over, insert hook in next st and pull up a loop) twice, (yarn over, insert hook in next st indicated and pull up a loop) twice, yarn over and pull through all 9 loops.
Wreath
Ch 16
Row 1: SP over (4th and 7th ch from hook), *ch 2, SP over (same ch as last SP, sk 2 ch, next ch), rep from * across, ch 1, hdc in same ch as last SP, turn. ( 4 SPs)
Row 2: Ch 2, puff in top of first sp (where the two legs of the SP meet in the middle), *ch 2, SP over (same SP and next SP), rep from * across, ch 2, puff in same SP, hdc in 2nd ch of turning ch, turn. (2 puffs, 3 SPs)
Row 3: Ch 3, SP over (first puff and next SP), * ch 2, SP over (same SP and next SP), rep from * to last SP, SP over (same SP and next puff), ch 1, hdc in the turning ch.
Check that your work is wide enough to wrap around your wreath form. If it is too big or too small you can adjust your starting chain as long as it is a multiple of 3 + 4.
Repeat rows 2 and 3 until your work is as long as the circumference of your wreath form. Sew the two short sides together, wrap your work around the wreath form and sew the long sides together to secure it.
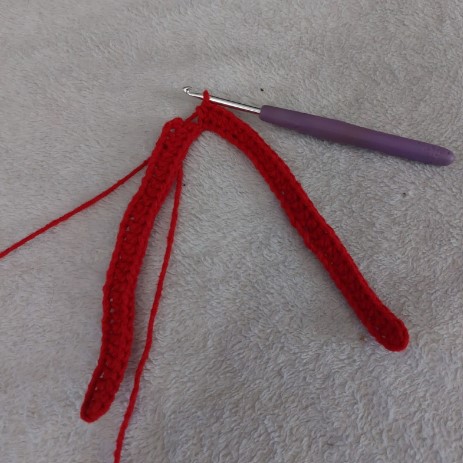
Teeth (Make 10 with White)
Ch 15, sl st to the 2nd ch from the hook, sc in each of the next 3 sts, hdc in each of the next 4 sts, dc in each of the next 5 sts, ch 3, sl st to the last st.
Do not turn, instead rotate your work so you can make your next stitches along the opposite side of the foundation chain.
Ch 3, dc in each of the next 5 sts, hdc in each of the next 4 sts, sc in each of the next 3 sts, sl st in the next st, ch 2 and sl st to the 1st sl st. Fasten off.
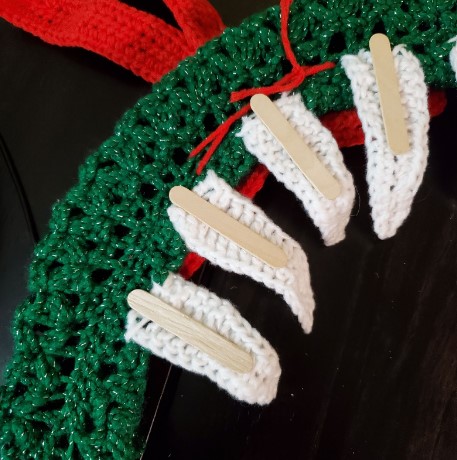
Attach the teeth to your wreath – you can use hot glue or sew them on using your yarn tails. Glue or sew popsicle sticks behind them like shown so they stand up. You could also use stiff felt, plastic canvas, or sturdy cardboard.
Eyes (Make 2 with Yellow)
Round 1: Ch 6, hdc in the 2nd ch from the hook and in each of the next 3 chs, 3 hdc in the last st. Do not turn, instead rotate your work so you can make your next stitches along the opposite side of the foundation chain. Hdc in each of the next 3 sts, 2 hdc in the next st (this is the same st that you started in), sl st to the first sc to join.
Round 2: Ch 1, sc in the first st and in each st around. (Your work will curl a bit on the edges, and that’s ok!)
Sew or hot glue the eyes to the wreath. Use black yarn for the pupils.
Bow (Make 1 with Red)
Ch 31, hdc in the 2nd ch from the hook and in each ch across, do not turn. (We’ll call this your first “leg”), Ok, now repeat the underlined portion again to create the 2nd leg. You should have something that looks like this:
Repeat that underlined portion 4 more times and you should have something that looks like this:
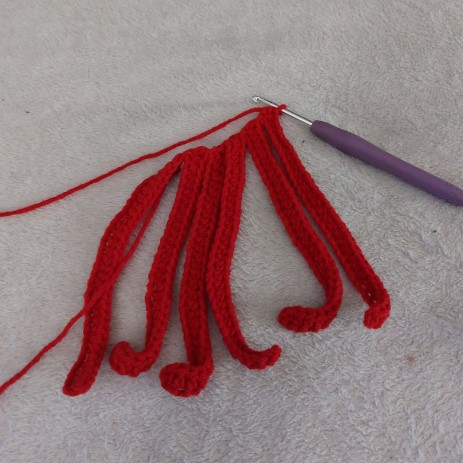
Ok, so now we’re going to sl st to the first hdc of the first leg that we made to turn our line of dangly things into a circle of dangly things.
Ok, now ch 1 and hdc in each st across that first leg. Make 3 more hdc in the final st. Do not turn, instead rotate your work so you can make your next stitches along the opposite side of the foundation chain. Hdc in each st across. Then, without slip stitching or anything, proceed to hdc in each st across the next leg. Make 3 more hdc in the final st, rotate your work and hdc in each st across the opposite side of the foundation chain. Repeat the underlined portion for the other 4 legs. Don’t fasten off.
Finally, ch 6 and hdc in the 2nd ch from the hook and in each ch across. Ch 1 and turn, hdc in each of the next 5 sts. (This makes the bow center) Fasten off and leave a long tail for sewing.
Now lay your work down with all your legs facing the same direction. The middle two legs will form the dangly bits of the bow, so you can just leave them alone. Fold the first 2 legs into the middle and fold the last 2 legs into the middle like this:
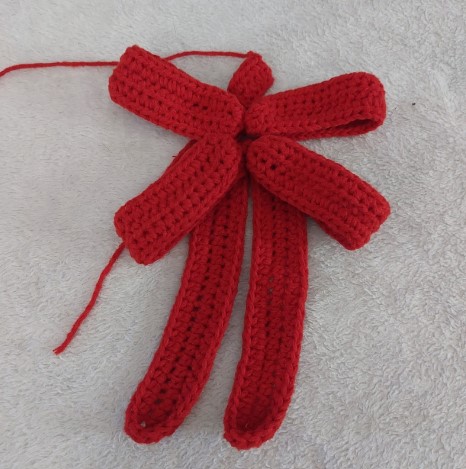
Then just fold down the bow center across the tips of those 4 legs and use your tail to sew the bow center to the tips. After all the legs are good and secure you can use the same yarn tail to attach the bow to your wreath.
To make the skull I grabbed a lid off a medicine bottle and drew the face on with a sharpie. Then I just glued the lid to the middle of the bow like this:
__________________________
If you loved this free crochet pattern, be sure to check out these other patterns!
© 2025 Littlejohn’s Yarn. All rights reserved.
Originally designed by Nine Inspired, this pattern has found a new home with Littlejohn’s Yarn and is shared here with permission.