
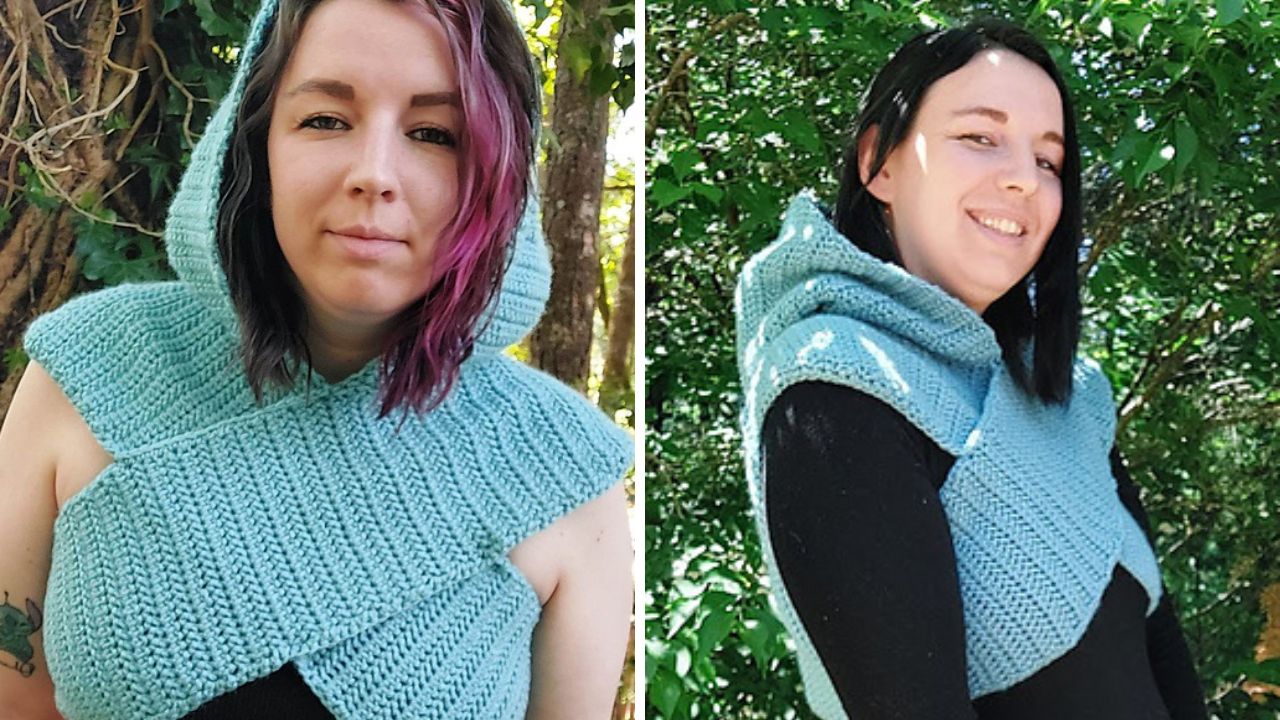
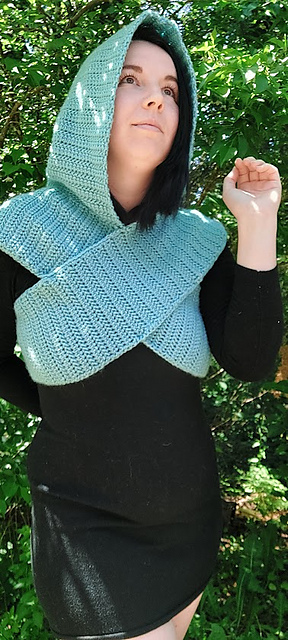
Say goodbye to boring and hello to fun alternative fashion with the Artemis Crossover Vest. The cropped, hooded design is great for wearing over a sports bra or layered over a sweater or dress.
Honestly, I would have made this in black (like the majority of my clothes) but I was drowning in blue yarn at the time, so here we are.
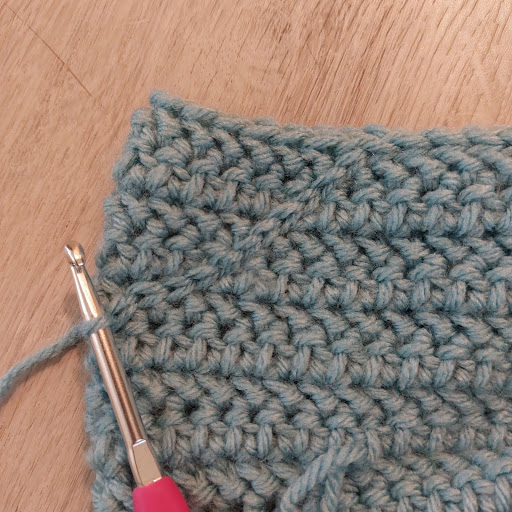
I used the herringbone half double crochet stitch for this design that gives the piece an interesting texture that almost looks knit. It also makes a nice opaque fabric that’s not see through.
The neat thing about this design is that it’s crocheted all in one piece. The construction may look confusing, but I’ve included plenty of photos to walk you through it step-by-step.
- Get the ad-free, large print, printable PDF pattern HERE. Scroll down for the free version.
- Add this pattern to your Ravelry queue HERE.
Materials
- Worsted, size 4, medium yarn (Sample is Red Heart With Love in Iced Aqua)
- US H-8 / 5 mm crochet hook
- 5 stitch markers
- Embroidery needle
- Tape measure
Finished Measurements & Yardage Estimates
| Size | Length | Chest | Yardage |
| S | 12.5” | 32” | 700 |
| M | 12.5” | 36” | 775 |
| L | 14” | 40” | 825 |
| XL | 14” | 44” | 900 |
| 2X | 15” | 48” | 975 |
| 3X | 15” | 52” | 1,000 |
| 4X | 15” | 56” | 1,025 |
| 5X | 15” | 60” | 1,050 |
Abbreviations
US Terminology
- ch = chain
- sc = single crochet
- sk = skip
- sl st = slip stitch
- st(s) = stitch(es)
Special Stitches
hhdc = herringbone half double crochet (yarn over, insert your hook into the stitch indicated, yarn over and pull up a loop so you have 3 loops on your hook, pull the loop closest to the end of the hook through the 2nd loop on the hook, yarn over and pull through the remaining 2 loops on your hook)
hhdc dec = herringbone half double crochet decrease (I recommend doing an invisible decrease like this: yarn over, insert hook into the front loop of the next st and the front loop of the following st, yarn over and pull through the first 2 loops on hook, yarn over and pull through the 3 remaining loops on hook)
Note: You may choose to use regular half double crochet stitches instead if you prefer, just make sure that you are able to get gauge.
Notes
- The ch 1 at the beginning of a row does not contribute to the stitch count.
- Stitch counts are given at the end of the row in the following format: S (M, L, XL) (2X, 3X, 4X, 5X)
Gauge
10 rows x 14 stitches = 4 x 4 inches
Pattern for Gauge
Row 1: ch 17, hhdc in the 2nd ch from the hook and in each ch across. Ch 1 and turn. (16)
Row 2: hhdc in the first st and in each st across. Ch 1 and turn.
Rows 3-12: Repeat row 2.
Measuring Gauge
Use a ruler or tape measure to measure 4 inches of stitches in the middle of your swatch—do not include your first or last stitches as those stitches can be inconsistently sized. Count the number of stitches you can measure in those 4 inches. Then measure 4 inches of rows in the middle of your swatch—do not include your first or last rows. Count the number of rows you can measure in those 4 inches.
Troubleshooting
- If your swatch ends up too small, try again with a larger hook size—1 half or full size up.
- If your swatch ends up too big, try again with a smaller hook size—1 half or full size down.
- If your number of rows is right but your number of stitches is off, then you will need to try again with a different size hook. It is much more important to match the number of stitches! If your gauge is even 1 or 2 stitches off, it can add up to a big size difference in the end.
- If your number of stitches is right, but your number of rows is off, that’s ok. I have given measurements as well as row counts to make things easier. Just keep a tape measure handy!
Good to go? Let’s get started!
Crossover Crochet Hooded Vest Pattern
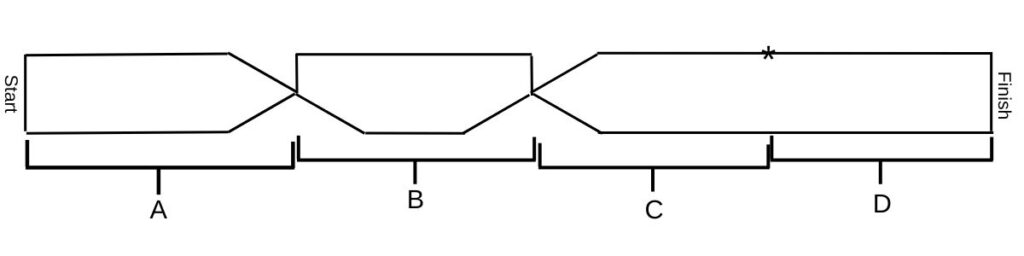
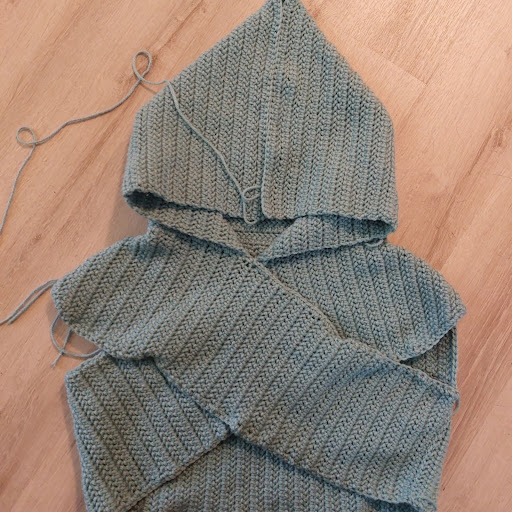
Visualizing: We will begin by crocheting one long panel. I have divided the panel into 4 sections for ease of reference, but it’s all crocheted continuously as one big piece, without fastening off between sections.
Starting Chain:
| S | M | L | XL | 2X | 3X | 4X | 5X |
| 23 | 23 | 25 | 25 | 27 | 27 | 27 | 27 |
Note: You may add or remove chains here to adjust the width of the panels. Keep in mind that this will also affect the finished length of the piece, which will be twice the width of the panel. You will need to chain an odd number in order for everything to line up correctly.
Section A
Row 1: hhdc in the 2nd ch from the hook and in each ch across. Ch 1 and turn. 22 (22, 24, 24) (26, 26, 26, 26)
Row 2: hhdc in the first st and in each st across. Ch 1 and turn.
Repeat row 2 until your work reaches the following row total or measurement:
| S | M | L | XL | 2X | 3X | 4X | 5X |
| 44 | 48 | 49 | 54 | 57 | 60 | 62 | 65 |
| 17.5” | 19” | 19.5” | 21.5” | 22.75” | 23.75” | 24.75” | 25.75” |
The next row: hhdc dec, hhdc across to the last 2 sts, hhdc dec. Ch 1 and turn. 20 (20, 22, 22) (24, 24, 24, 24)
Repeat the last row until you only have 2 sts remaining.
Section B
Ch the number indicated in the chart below.
| S | M | L | XL | 2X | 3X | 4X | 5X |
| 11 | 11 | 13 | 13 | 15 | 15 | 15 | 15 |
Row 1: hhdc in the 2nd ch from the hook and in each ch across to the last ch, 2 hhdc in the last ch. Ch 1 and turn. 11(11, 13, 13) (15, 15, 15, 15)
Row 2: 2 hhdc in the first st, hhdc in each remaining st across. Ch 1 and turn. 12(12, 14, 14) (16, 16, 16, 16)
Row 3: hhdc in the first st and each st across to the last st, 2 hhdc in the last st. Ch 1 and turn. 13(13, 15, 15) (17, 17, 17, 17)
Repeat Rows 2 and 3 until you have 22(22, 24, 24) (26, 26, 26, 26) sts.
The next row: hhdc in the first st and each st across. Ch 1 and turn.
Repeat the last row until Section B reaches the following row total or measurement:
| S | M | L | XL | 2X | 3X | 4X | 5X |
| 33 | 35 | 37 | 37 | 39 | 39 | 39 | 39 |
| 13” | 14” | 15” | 15” | 15.5” | 15.5” | 15.5” | 15.5” |
Note: Your next row needs to be an even row in order for everything to line up correctly.
The next row: hhdc dec, hhdc in each remaining st across. Ch 1 and turn. 21(21, 23, 23) (25, 25, 25, 25)
The next row: hhdc in the first st and each st across to the last 2 sts, hhdc dec. Ch 1 and turn. 20(20, 22, 22) (24, 24, 24, 24)
Repeat the last 2 rows until you have 10 (10, 12, 12) (14, 14, 14, 14) sts.
Section C
Row 1: 2 hhdc in the first st, 2 hhdc in the second st, leave the remaining sts unworked. Ch 1 and turn. 4(4, 4, 4, 4) (4, 4, 4, 4)
Row 2: 2 hhdc in the first st, hhdc across to the last st, 2 hhdc in the last st. Ch 1 and turn. 6(6, 6, 6, 6) (6, 6, 6, 6)
Repeat the last row until you have 22(22, 24, 24) (26, 26, 26, 26) sts.
Row 3: hhdc in the first st and in each st across. Ch 1 and turn.
Repeat Row 3 until you reach the same row count or measurement you ended Section A with.
Section D
The next row: placing a stitch marker at the beginning of this row, hhdc in the first st and in each st across. Ch 1 and turn.
The next row: hhdc in the first st and in each st across. Ch 1 and turn.
Repeat the last row until Section D reaches the following row total or measurement:
| S | M | L | XL | 2X | 3X | 4X | 5X |
| 34 | 38 | 43 | 48 | 53 | 57 | 59 | 63 |
| 13.25” | 15” | 17” | 19” | 21” | 22.5” | 23.5” | 25” |
Fasten off leaving a long tail for sewing, or keep the yarn attached if you plan on crocheting your piece together. (See below for more details.)
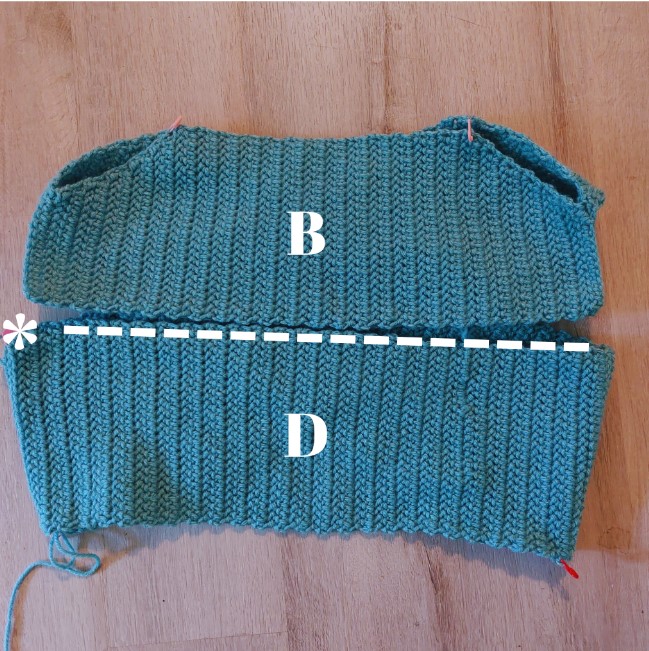
Assembly
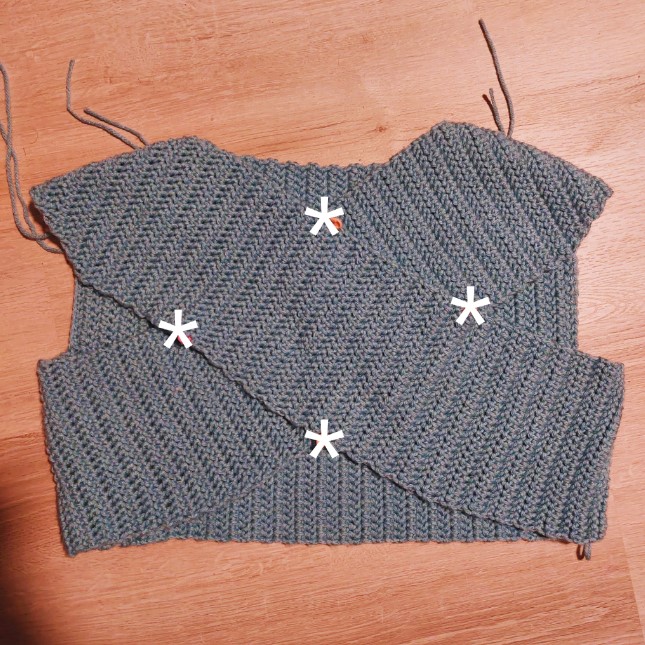
Step 1: Arrange the work as shown. Section D runs horizontally, Section C crosses over from the bottom left to the top right, Section B runs horizontally and parallel to D, and Section A crosses over from the top left to the bottom right.
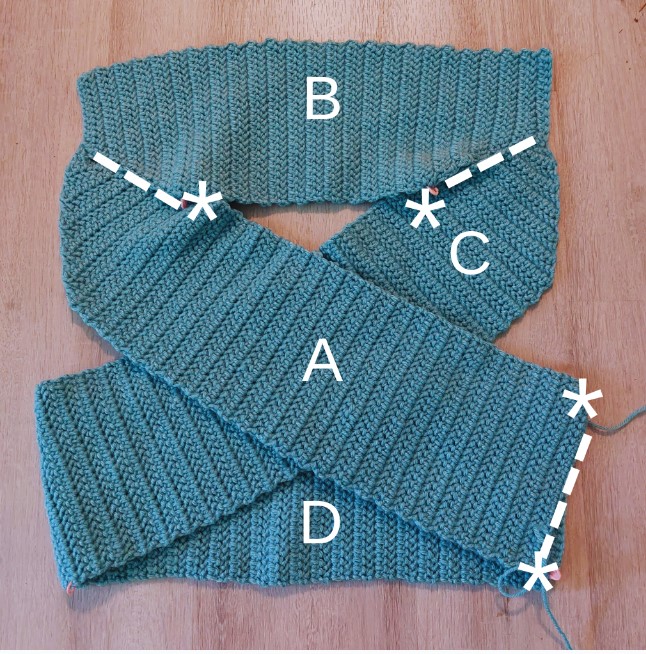
Step 2: Attach 4 stitch markers as indicated by the asterisks. Use 2 stitch markers to connect the beginning of Section A with the ending of Section D. Use 1 stitch marker to connect the slanted part of the end of Section A with the slanted part at the beginning of Section B. Use 1 stitch marker to connect the slanted part at the end of Section B with the slanted part at the beginning of Section C.
Step 3: Attach the pieces together as indicated in the photo above by the dashed lines. You may choose to sl st the pieces together or hand sew them. I recommend using the mattress stitch if you decide to hand sew. Remove the stitch markers as you get to them.
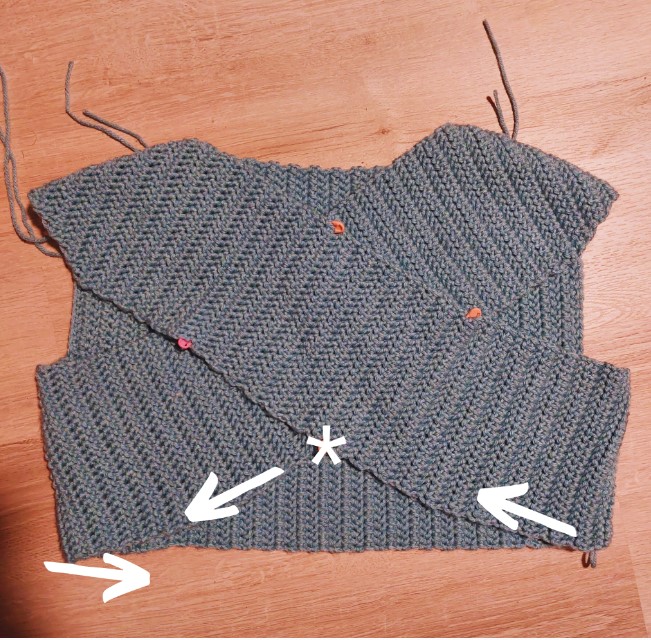
Step 4: Keeping Section A facing you, fold Section B down and away from you to tuck it underneath the crossed pieces. Flip the piece over and line up the flat side of Section B with the center of Section D (you may have more stitches in Section D than in Section B). You’ll be able to tell where Section C ends and Section D begins thanks to that stitch marker we placed earlier. Sew or crochet the two edges together.
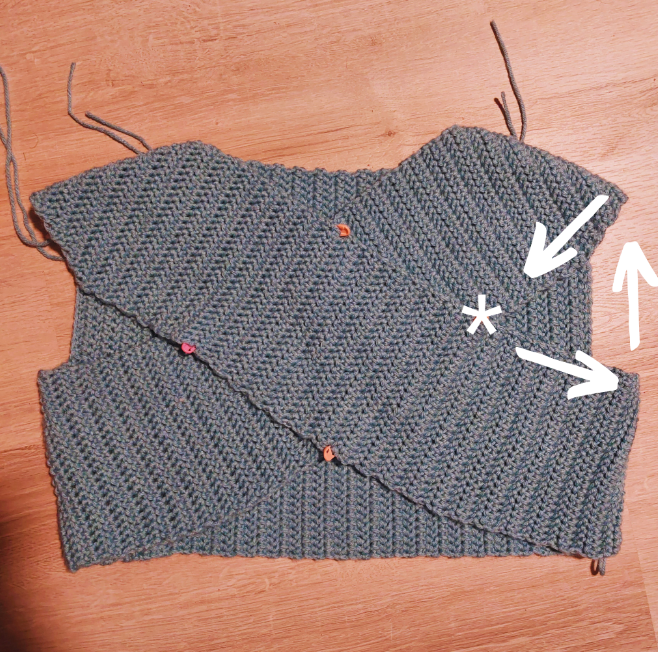
Step 5: Flip the piece back over to the front and attach 4 stitch markers as indicated by the asterisks. Go through both layers of fabric when you place the stitch markers so it holds them in place. I found it easiest to do this while wearing the piece. If you feel like the neckhole is too small with the topmost stitch marker in place, you can skip that one. I found the neckhole on mine to be a bit snug but I did appreciate the extra coziness.
Step 6: Attach your yarn through both layers of fabric at the stitch marker indicated by the asterisk. Working in the direction of the arrows and going through just one layer now, evenly sc down the side of Section C, across the bottom of Section D, and along the side of Section A. Continue to the next part without fastening off.
Step 7: Continue to sc along the side of Section A, sc once through both layers of fabric when you get to the stitch marker indicated with an asterisk. Continue going through just one layer and sc around the armhole working in the direction of the arrows until you get back to the stitch marker. Work one more sc through both layers, fasten off, and weave in ends.

Step 8: Attach your yarn through both layers of fabric at the stitch marker indicated by the asterisk. Working in the direction of the arrows and going through just one layer, evenly sc around the armhole until you get back to the stitch marker. Work one more sc through both layers and continue to the next part without fastening off.
Continue to sc along the side of Section A. When you get to the stitch marker indicated by an asterisk, work one sc through both layers of fabric (skip this if you would like a wider neckhole). Working in the direction of the arrows and going through just one layer, evenly sc around the neckhole until you get back to the stitch marker. Work one more sc through both layers (or skip again), ch 1, turn, and continue to the next part without fastening off.

Hood
Row 1: hhdc in the first st and each st back around to the stitch marker, ch 1 and turn.
Row 2: hhdc in the first st and each st across, ch 1 and turn.
Repeat the last row until you have reached 14” or 35 rows.
Turn the piece inside out, fold down the sides of the hood as shown and sl st across the top going through both layers of fabric.
When you get to the last couple of inches, use surface sl sts to crochet the top of the hood closed at an angle as shown. Fasten off, weave in ends, turn it right side out, and it’s ready to rock!
Did you love this crochet pattern? You might like these other free crochet vest patterns!

© 2025 Littlejohn’s Yarn. All rights reserved.
Originally designed by Nine Inspired, this pattern has found a new home with Littlejohn’s Yarn and is shared here with permission.